Version 2.0 (2011)
Tutorial
INDEX
INTRODUCTION
INSTALLATION
SET UP
1. Creation of a local RefSeq mRNA entries database
1.1. UniGene data
1.2. Download the RefSeq sequences from UCSC "Genome Browser"
1.3. Download the RefSeq data from UCSC "Genome Browser"
2. Creation of a local EST entries database
2.1. Download the EST data from UCSC "Genome Browser"
2.2. Download the EST sequences from UCSC "Genome Browser"
3. 5'_ORF_Extender Results
3.1. Download "spliced EST" information from UCSC "Genome Browser"
3.2. Download "library" information from UCSC "Genome Browser"
GENERAL DEFINITIONS
4.1 File
4.2 Table
4.3 Record
4.4 Field
4.5 Layout
4.6 Browse Mode
4.7 Find Mode
4.8 Preview Mode
MENU AND COMMANDS
5.1 5'_ORF_Extender
5.2 File
5.3 Edit
5.4 View
5.5 Records
5.6 Scripts
5.7 Help
TROUBLESHOOTING
NOTE - Be sure that your system
default
format uses
"." (full stop mark)
as a decimal separator (English standard).
If this is not the case, you must change the system setting.
Mac OS X: in "System Preferences" (from the "Apple" Menu),click on "International", then on "Formats", then choose as "Region" a country with the English standard format for numbers (full stop mark as a decimal separator).
System restart or user logout is not required to make the change effective.
Windows: in "Control Panel" (from the "Start" Menu), click on "International options" then modify the format of numbers choosing a country with the English standard format for numbers (full stop mark as a decimal separator).
System restart or user logout is not required to make the change effective.
SET UP
1. Creation of a local RefSeq mRNA entries database (Back to Index)
In
this section, the user is guided to import RefSeq mRNA genomic
coordinates
and sequences from UCSC genome browser into the 'RefSeq_mRNA' table of
the software.
In addition, a table matching each
mRNA or EST sequence of the investigated organism to a genomic locus is
imported following its obtainment from UniGene data.
1.1) UniGene data
To
avoid that EST matching a paralogous mRNA are considered as positive
results, the software uses UniGene data to
match each mRNA or EST sequence to a unique genomic locus.
To this aim, the user should import the output file of 'UniGene Tabulator' (version 1.1 or later) software, a tool able to parse the whole UniGene database for an organism of interest.
To this aim, the user should import the output file of 'UniGene Tabulator' (version 1.1 or later) software, a tool able to parse the whole UniGene database for an organism of interest.
Go to the website page:
http://apollo11.isto.unibo.it/software/UniGene_Tabulator/
Your default internet browser will show the software download page.
Download the current version of the software for your OS.
Please
follow the instructions in the UniGene
Tabulator User Tutorial
to automatically parse UniGene data for the organism of your interest.
Note that for '5'_ORF_Extender' purpose, it is not necessary to import the UniGene library data file into UniGene Tabulator.
Note that for '5'_ORF_Extender' purpose, it is not necessary to import the UniGene library data file into UniGene Tabulator.
The parsing process could employ several hours to complete, depending on the amount of data available for the selected organism.
The software will create the 'UniGene.tab' file within the 'UniGene Tabulator' folder. Put this resulting file into the '5'_ORF_Extender' folder.
Due
to possible errors in the large text file generated by UniGene
data parsing a quality control
of the completeness of UniGene entries
is made as described in the software guide of the TRAM tool:
http://apollo11.isto.unibo.it/software/TRAM/Docs/TRAM_Guide.html#Import_UniGene_Data
except than the 'UniGene' table in named 'UniGene_ID' in '5'_ORF_Extender'.
http://apollo11.isto.unibo.it/software/TRAM/Docs/TRAM_Guide.html#Import_UniGene_Data
except than the 'UniGene' table in named 'UniGene_ID' in '5'_ORF_Extender'.
1.2) Downloading the RefSeq sequences from UCSC "Genome Browser"
Go
to the website
page::
http://genome.ucsc.edu/cgi-bin/hgTables?command=start
On the web browser page select:
clade: your investigated clade (e.g., Mammal)
genome: your investigated genome (e.g., Human)
group: "mRNA and EST Tracks"
track: "Human mRNAs"
table: "RefSeq Genes (refGene)"
region: "genome"
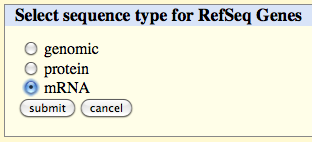
output format: "sequence"
output file: RefSeq_Seq.txt
file type returned: gzip compressed
Click on the 'get output' button, select 'mRNA' and click on the 'submit' button.
Once the download of the file 'RefSeq_Seq.txt.gz' is complete, decompress it and put the resulting 'RefSeq_Seq.txt' file into the '5'_ORF_Extender' folder.
http://genome.ucsc.edu/cgi-bin/hgTables?command=start
On the web browser page select:
clade: your investigated clade (e.g., Mammal)
genome: your investigated genome (e.g., Human)
group: "mRNA and EST Tracks"
track: "Human mRNAs"
table: "RefSeq Genes (refGene)"
region: "genome"
output format: "sequence"
output file: RefSeq_Seq.txt
file type returned: gzip compressed
Click on the 'get output' button, select 'mRNA' and click on the 'submit' button.
Once the download of the file 'RefSeq_Seq.txt.gz' is complete, decompress it and put the resulting 'RefSeq_Seq.txt' file into the '5'_ORF_Extender' folder.
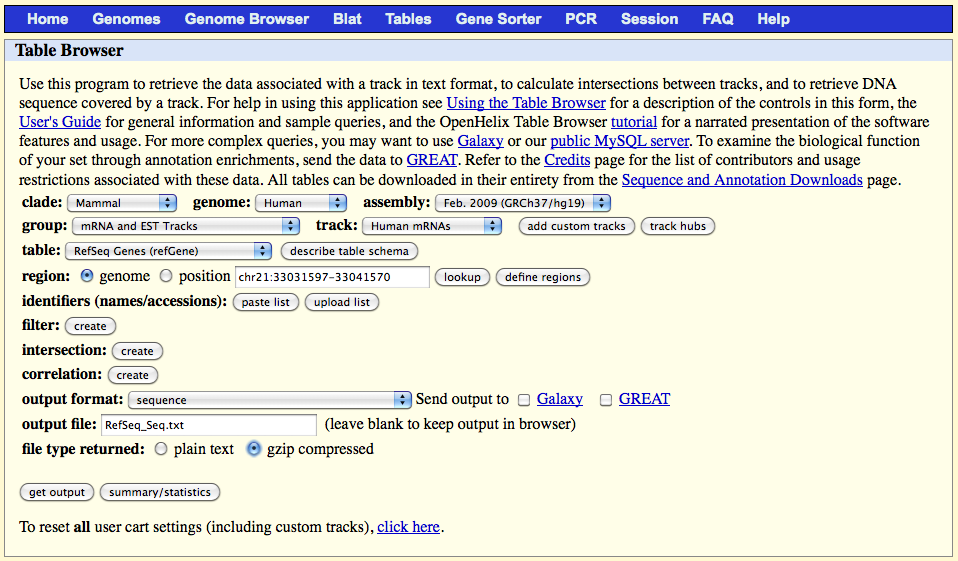
1.3) Dowloading the RefSeq data from UCSC "Genome Browser"
Go to the website page:
http://genome.ucsc.edu/cgi-bin/hgTables?command=start
On the web browser page select:
clade: your investigated clade (e.g., Mammal)
genome: your investigated genome (e.g., Human)
group: "mRNA and EST Tracks"
track: "Human mRNAs"
table: "RefSeq Genes (refGene)"
region: "genome"
output format: "selected fields from primary and related tables"
output file: RefSeq_Data.txt
file type returned: gzip compressed
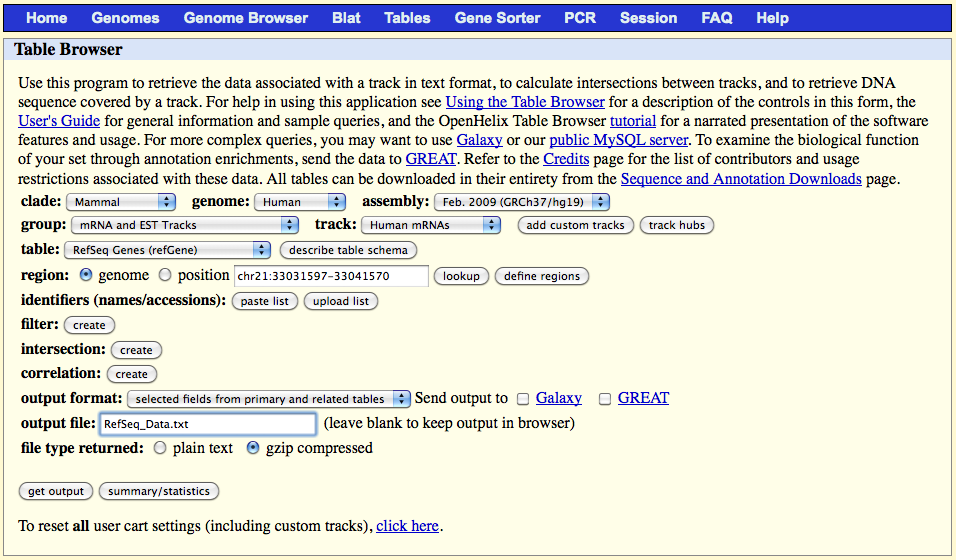
Click on the 'get output' button and select the following fields in the table which appears:
name
chrom
strand
txStart
txEnd
cdsStart
cdsEnd
exonStarts
exonEnds
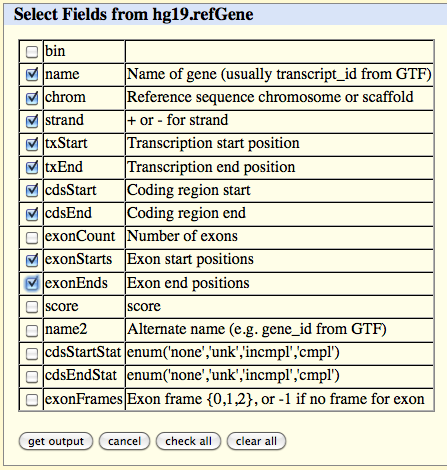
Click on the 'get output' button at the bottom of the page.
Once the download of the file 'RefSeq_Data.txt.gz' is complete, decompress it and put the resulting 'RefSeq_Data.txt' file into the '5'_ORF_Extender' folder.
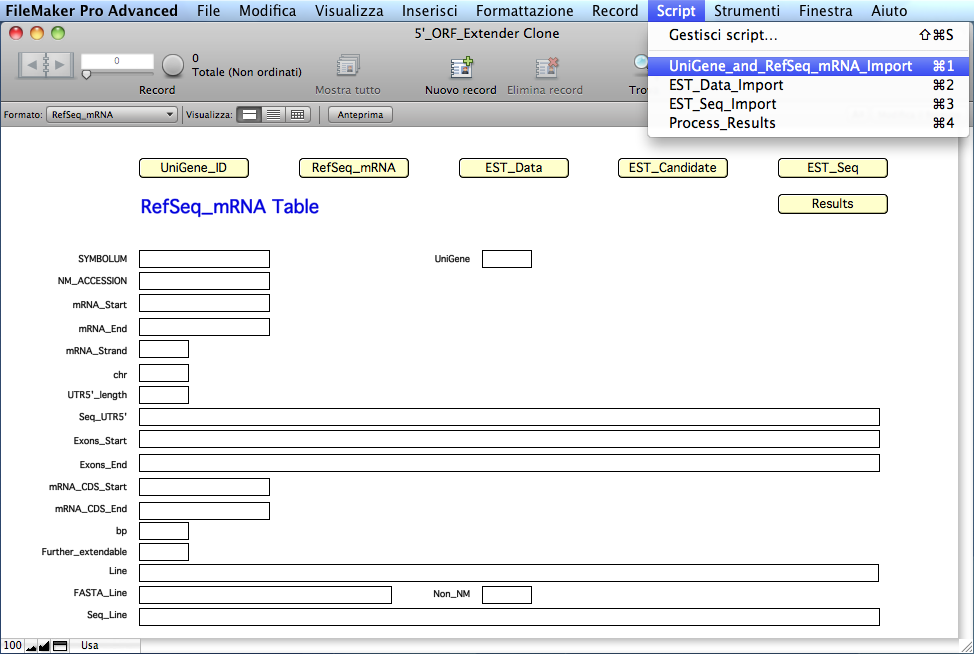
Open the '5'_ORF_Extender' software.
The yellow buttons will help to navigate between software tables.
Import
the UniGene data and RefSeq data (files 'UniGene.tab', 'RefSeq_Seq.txt' and 'RefSeq_Data'.txt located in the '5'_ORF_Extender' folder) selecting
the script "UniGene_and_RefSeq_mRNA_Import"
from the "Scripts" menu
and chosing "Yes" in the window
which appears. The data will be automatically
imported in the appropriate table of the '5'_ORF_Extender' software ('UniGene_ID' and 'RefSeq_mRNA', respectively)
deleting any previously imported data.
Here the RefSeq_mRNA table:
The
software will calculate and
extract information for each mRNA record in specific calculated fields of the 'RefSeq_mRNA'
table:
FIELD DESCRIPTION
FIELD "SYMBOLUM": the gene symbol;
FIELD "UniGene": it shows "Yes" if a gene symbol has been assigned to
the mRNA by Unigene;
FIELD "NM_ACCESSION": the entry GenBank accession number;
FIELD "mRNA_Start": the genomic coordinate of the mRNA start;
FIELD "mRNA_End": the genomic coordinate of the mRNA end;
FIELD "Strand": shows "+" or "-" for genome strand, respectively;
FIELD "chr": the chromosome location;
FIELD "UTR5'_length": the length of the mRNA 5´ UTR sequence;
FIELD "Seq_UTR5'": the mRNA 5´ UTR sequence;
FIELD "Exons_Start": the genomic coordinates of the exons start;
FIELD "Exons_End": the genomic coordinates of the exons end;
FIELD "mRNA_CDS_Start": the genomic coordinate of the initiation codon start;
FIELD "mRNA_CDS_End": the genomic coordinate of the stop codon end;
FIELD "bp": length of the entry sequence (in bp);
FIELD "Further_Extendable": shows "Yes" in the absence of an in-frame stop codon
upstream of the described initiation codon in the mRNA
sequence entry;
FIELD "Line": field used only during data parsing;
FIELD "FASTA_Line": the entry in FASTA format;
FIELD "Seq_Line": the mRNA sequence;
FIELD "Non_NM": field used during data parsing to remove non "NM_"
(non-RefSeq) entry type.
At the end of
this step, the software will have automatically determined which mRNA
is candidate for extension of its 5´ CDS, due to the absence
of an in-frame stop
codon upstream of the
described
initiation codon in the mRNA sequence entry, and will have create a
list of the EST accession numbers for all ESTs assigned by UniGene to
these mRNAs.
The final output is therefore the creation of the 'EST_List.txt' file in the '5'_ORF_Extender' folder.
The software also generates a list of RefSeq mRNAs with a complete CDS (due to the presence of an in-frame stop codon upstream of the described initiation codon in the mRNA sequence) by automatically creating the 'RefSeq_mRNAs_with_Complete_ORF.txt' text file in the '5'_ORF_Extender' folder. This file is generated following selection of the mRNAs whose "Further_Extendable" field shows "No" and it contains two columns: gene symbol and mRNA GenBank accession number.
In
this section, the user is guided to download EST genomic coordinates
from
UCSC genome browser and to import them into the 'EST_Data' table of
the software.
The EST genomic coordinates are relative to the part of the EST aligned to the genome by BLAT at UCSC.
User will import these data for the EST assigned to all mRNAs potentially further extendable at their 5´ CDS, using the file 'EST_List.txt' created in the previous A. step.
The EST genomic coordinates are relative to the part of the EST aligned to the genome by BLAT at UCSC.
User will import these data for the EST assigned to all mRNAs potentially further extendable at their 5´ CDS, using the file 'EST_List.txt' created in the previous A. step.
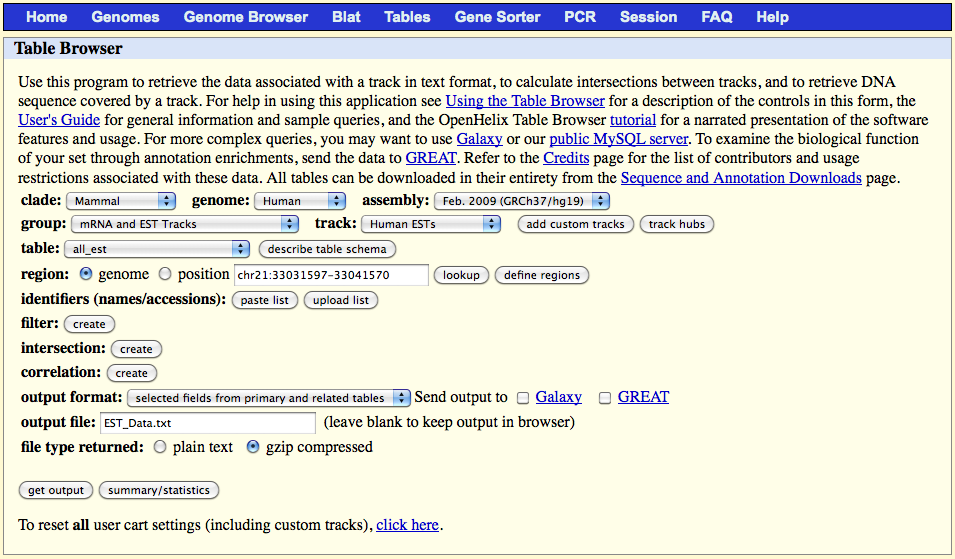
2.1) Dowload the EST data from UCSC "Genome Browser"
Go to the website page:
http://genome.ucsc.edu/cgi-bin/hgTables?command=start
On the web browser page select:
clade: your investigated clade (e.g., Mammal)
genome: your investigated genome (e.g., Human)
group: "mRNA and EST Tracks"
track: "Human ESTs"
table: "all_est"
region: "genome"
identifiers (names/accessions): click on the 'upload list' button and select the
'EST_List.txt' file created in the previous
step and located in the '5'_ORF_Extender' folder
output format: "selected fields from primary and related tables"
output file: EST_Data.txt
file type returned: gzip compressed
Click on the 'get output' button and select the following fields in the table which appears:
strand
qName
tStart
tEnd
blockCount
blockSize
qStart
tStart
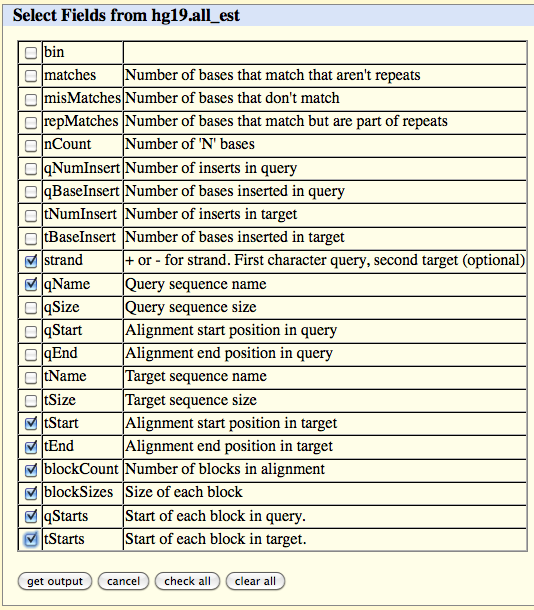
Click
on the 'get output' button at
the bottom of
the page.
Once the download of the file 'EST_Data.txt.gz' is complete, decompress it and put the resulting 'EST_Data.txt' file into the '5'_ORF_Extender' folder.
Once the download of the file 'EST_Data.txt.gz' is complete, decompress it and put the resulting 'EST_Data.txt' file into the '5'_ORF_Extender' folder.
Import
this file in
the 'EST_Data' table of the '5'_ORF_Extender' software, by
clicking on the
'EST_Data' yellow button and selecting
the script "EST_Data_Import"
from the "Scripts" menu.
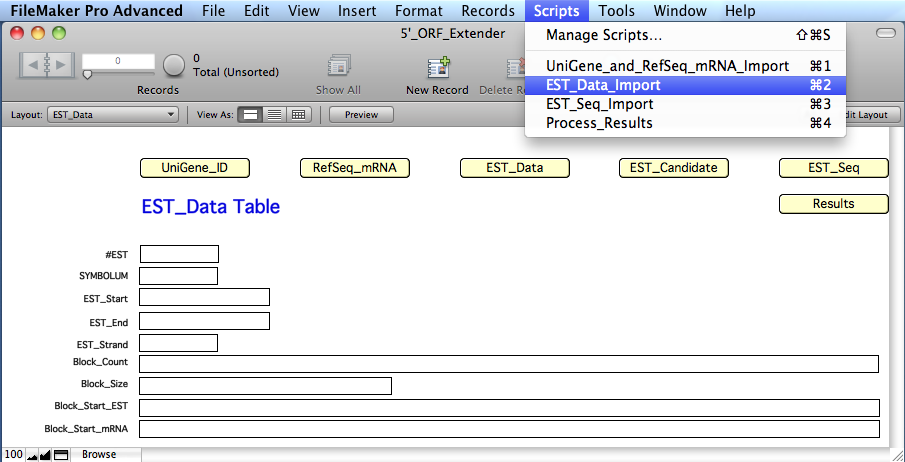
The
software will calculate and
extract information for each EST record in specific calculated fields of the 'EST_Data'
table:
FIELD DESCRIPTION
FIELD "#EST": the GenBank accession number of the EST entry;
FIELD "SYMBOLUM": the gene symbol of the locus to which the EST has been
assigned by the embedded UniGene data table;
FIELD "EST_Start": genomic start coordinate of the tract of the EST aligned to
genome by BLAT at UCSC;
FIELD "EST_End": genomic end coordinate of the tract of the EST aligned to
genome by BLAT at UCSC;
FIELD "EST_Strand": shows "+" or "-" for genome strand, respectively;
FIELD "Block_Count": the number of EST exons;
FIELD "Block_Size": the length of each EST exon;
FIELD "Block_Start_EST": the coordinate of each exon start in the EST sequence,
relative to the first aligned nucleotide of the EST;
FIELD "Block_Start_mRNA": the genomic coordinate of each exon start.
At the end of
this step, the software will have automatically determined which EST
is candidate for extension of its cognate mRNA 5´ CDS, due to the
greater extension of the EST sequence on the genome in comparison with
the position of mRNA 5´ end, and will
have create a
list of the EST accession numbers for all candidate ESTs.
The final output is therefore the creation of the 'EST_Candidate_List.txt' file in the '5'_ORF_Extender' folder.
The final output is therefore the creation of the 'EST_Candidate_List.txt' file in the '5'_ORF_Extender' folder.
In
this section, the user is guided to download from
UCSC genome browser sequences of the EST entries
candidate to extend an mRNA 5´
CDS and to import them into the
'EST_Seq' table of
the software.
Go to the website page:
http://genome.ucsc.edu/cgi-bin/hgTables?command=start
On the web browser page select:
clade: your investigated clade (e.g., Mammal)
genome: your investigated genome (e.g., Human)
group: "mRNA and EST Tracks"
track: "Human ESTs"
table: "all_est"
region: "genome"
identifiers (names/accessions): click on the 'upload list' button and select the
'EST_Candidate_List.txt' file created in the
previous step and located in the '5'_ORF_Extender'
folder
output format: "sequence"
output file: EST_Seq.txt
file type returned: gzip compressed
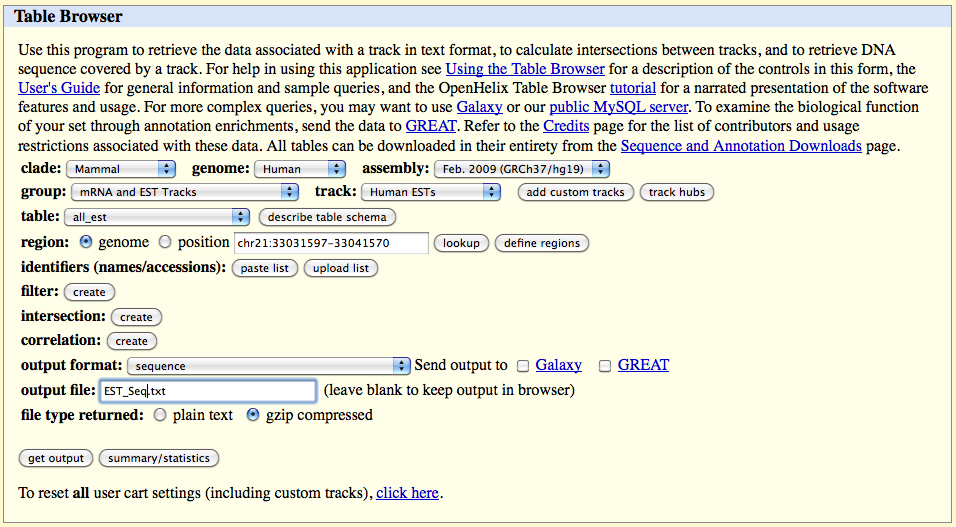
Click on the 'get output' button and select only the following fields in the page which appears (and deselect other fields):
Blocks
One FASTA record per item
All lower case
to lower case
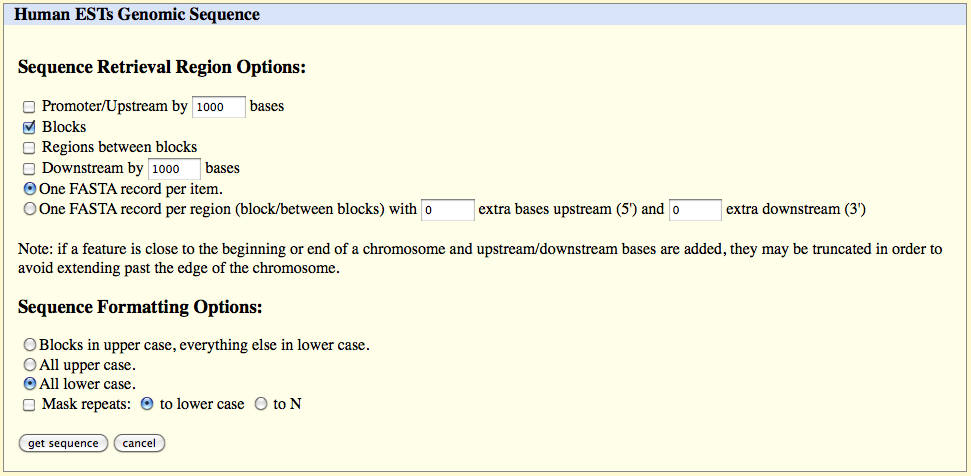
Click
on the 'get sequence' button.
Once the download of the file 'EST_Seq.txt.gz' is complete, decompress it and put the resulting 'EST_Seq.txt' file into the '5'_ORF_Extender' folder.
Once the download of the file 'EST_Seq.txt.gz' is complete, decompress it and put the resulting 'EST_Seq.txt' file into the '5'_ORF_Extender' folder.
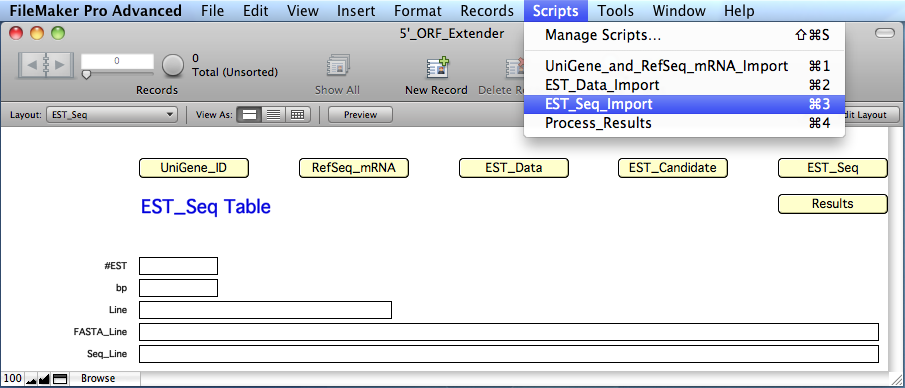
Import
this file in
the 'EST_Seq' table of the '5'_ORF_Extender' software, by
clicking on the 'EST_Seq'
yellow button and selecting
the script "EST_Seq_Import"
from the "Scripts" menu.
The
software will calculate and
extract this information in specific calculated fields:
FIELD DESCRIPTION
FIELD "#EST": the UniGene symbol of the EST matched entry;
FIELD "bp": the length of the entry sequence (in bp);
FIELD "Line": field used only during data parsing;
FIELD "FASTA_Line": field used only during data parsing;
FIELD "Seq_Line": the EST sequence.
At
the end of
this step, the software will have automatically determined which EST
is suitable to extend its cognate mRNA 5´ CDS, due to the presence
of a start codon upstream the mRNA known start codon and in frame with
it,
and will have create a
list of the EST accession numbers for all these ESTs.
The final output is therefore the creation of the 'EST_Final_List.txt' file in the '5'_ORF_Extender' folder.
The final output is therefore the creation of the 'EST_Final_List.txt' file in the '5'_ORF_Extender' folder.
To visualize the details of the EST data, including the mRNA 5´ CDS extended sequence when available as a positive result, switch to the 'EST_Candidate' table by clicking on the yellow 'EST_Candidate' button:
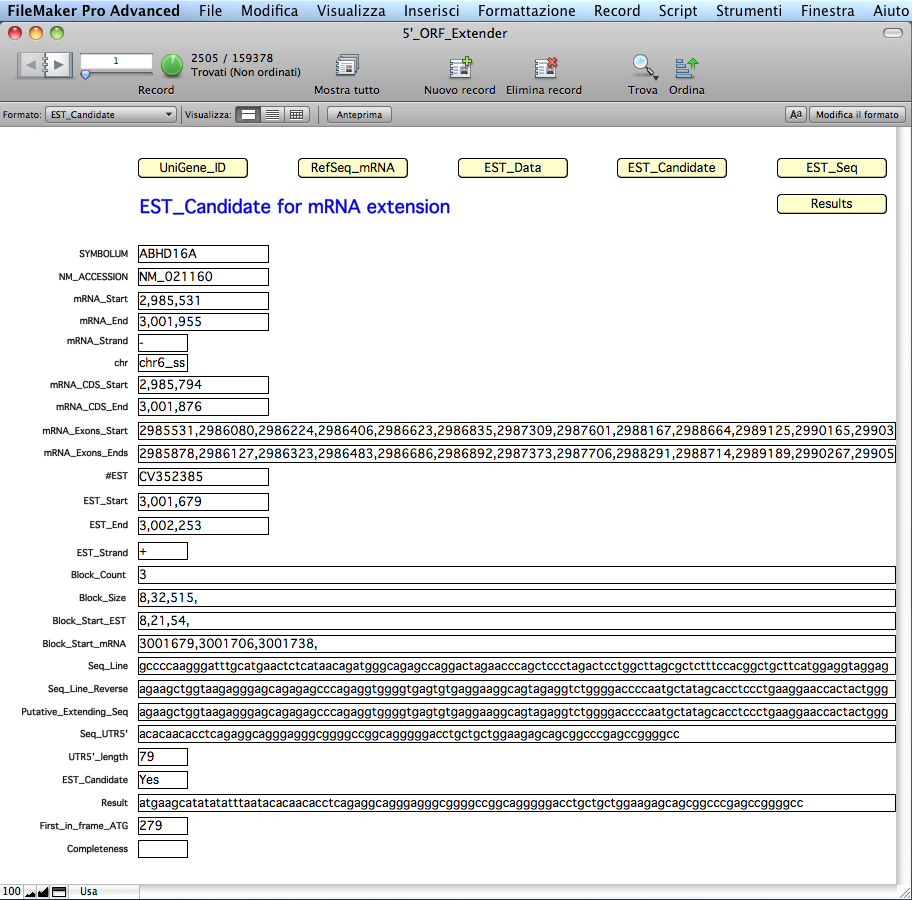
The
software has
calculated and
extracted this information for each candidate EST in specific
calculated fields:
FIELD DESCRIPTION
FIELD "SYMBOLUM": the gene symbol of the locus to which the EST has been
assigned by the embedded UniGene data table;
FIELD "NM_ACCESSION": the entry GenBank accession number of the mRNA to
which the EST has been matched by the embedded UniGene
data table;
FIELD "mRNA_Start": the genomic coordinate of the mRNA start;
FIELD "mRNA_End": the genomic coordinate of the mRNA end;
FIELD "Strand": shows "+" or "-" for genome strand, respectively;
FIELD "chr": the chromosome location;
FIELD "mRNA_CDS_Start": the genomic start coordinate of the initiation codon;
FIELD "mRNA_CDS_End": the genomic end coordinate of the stop codon;
FIELD "mRNA_Exons_Start": the genomic coordinate of the mRNA exons start;
FIELD "mRNA_Exons_End": the genomic coordinate of the mRNA exons end;
FIELD "#EST": the EST entry genBank accession number;
FIELD "EST_Start": genomic start coordinate of the tract of the EST
aligned to the genome by BLAT at UCSC;
FIELD "EST_End": genomic end coordinate of the tract of the EST
aligned to the genome by BLAT at UCSC;
FIELD "EST_Strand": shows "+" or "-" for genomic strand, respectively;
FIELD "Block_Count": the number of EST exons;
FIELD "Block_Size": the length of each EST exon;
FIELD "Block_Start_EST": the coordinate of each exon start in the EST sequence,
relative to the first aligned nucleotide of the EST;
FIELD "Block_Start_mRNA": the coordinate of each exon start in the mRNA
sequence, relative to the first aligned nucleotide of
the mRNA;
FIELD "Seq_Line": the EST sequence;
FIELD "Seq_Line_Reverse": the complement EST sequence, calculated if mRNA strand
and EST strand are discordant;
FIELD "Putative_Extending_Seq": the extended sequence from the first EST
genome-aligned base to the first EST base just
upstream the RefSeq mRNA known CDS;
FIELD "Seq_UTR5'": the mRNA 5´ UTR sequence;
FIELD "UTR5'_length": the length of the mRNA 5´ UTR sequence;
FIELD "EST_Candidate": it shows "Yes" if the EST is a candidate to extend the
mRNA entry, due to the presence of a new start codon
upstream the mRNA known start codon and in frame with
it;
FIELD
"Result":
the new extended mRNA 5´ end sequence, when available
as a positive result, which is the EST sequence
extending from the new first in-frame ATG codon
to the first base upstream the RefSeq mRNA known CDS;
as a positive result, which is the EST sequence
extending from the new first in-frame ATG codon
to the first base upstream the RefSeq mRNA known CDS;
FIELD "First_in_frame_ATG": the position of the most upstream ATG located in the
EST sequence upstream the RefSeq sequence, which is
in-frame with the start codon recorded in the RefSeq
mRNA sequence entry;
FIELD "Completeness": the EST sequence containing an mRNA ORF extension is
scanned for the presence of an in-frame stop codon
upstream of the new initiation codon identified in the
EST; if it is found, the field shows "Yes".
3. 5'_ORF_Extender Results (Back to Index)
In this section, the user is guided in downloading sequence information relative to the EST entries shown above to extend an mRNA 5´ CDS from UCSC genome browser and importing them into the 'Results' table of the software.
In particular, this will determine if the EST is classified as a "spliced EST" and if different ESTs extending the same mRNA derive from the same library or not.
3.1) Downloading "spliced EST" information from UCSC "Genome Browser"
Go to the website page:
http://genome.ucsc.edu/cgi-bin/hgTables?command=start
On the web browser page select:
clade: your investigated clade (e.g., Mammal)
genome: your investigated genome (e.g., Human)
group: "mRNA and EST Tracks"
track: "Spliced ESTs"
table: "intronEst"
region: "genome"
identifiers (names/accessions): click on the 'upload list' button and select the
'EST_Final_List.txt' file created in the previous
step and located in the '5'_ORF_Extender' folder
output format: "selected fields from primary and related tables"
output file: Spliced.txt
file type returned: gzip compressed
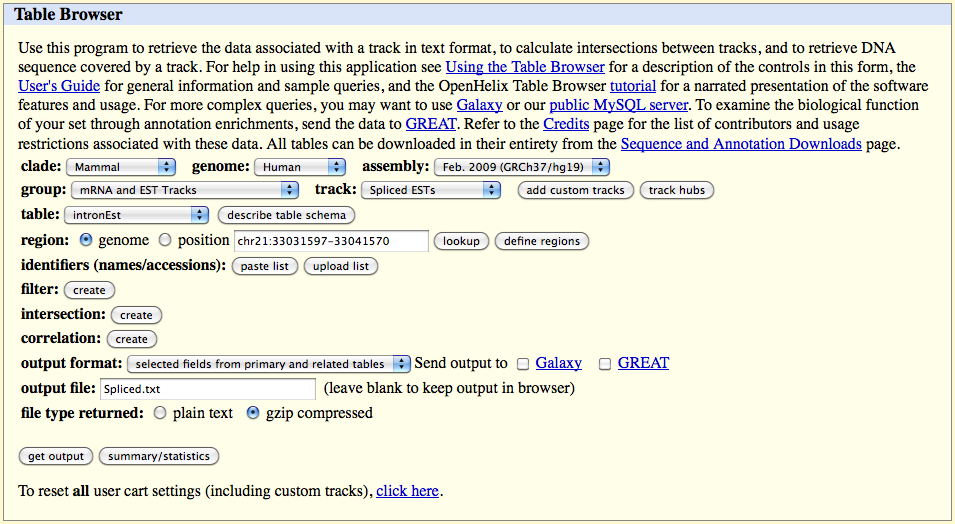
Click on the 'get output' button and select the following fields in the table which appears:
qName
qSize
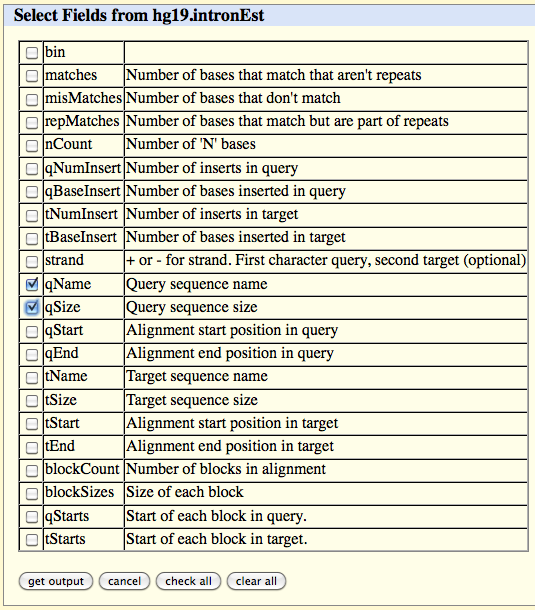
Click on the 'get output' button at the bottom of the page.
Once the download of the file 'Spliced.txt.gz' is complete, decompress it and put the resulting 'Spliced.txt' file into the '5'_ORF_Extender' folder.
3.2) Downloading "library" information from UCSC "Genome Browser"
Go to the website page:
http://genome.ucsc.edu/cgi-bin/hgTables?command=start
On the web browser page select:
clade: your investigated clade (e.g., Mammal)
genome: your investigated genome (e.g., Human)
group: "mRNA and EST Tracks"
track: "Human ESTs"
table: "all_est"
region: "genome"
identifiers (names/accessions): click on the 'upload list' button and select the
'EST_Final_List.txt' file created in the previous
step and located in the '5'_ORF_Extender' folder
output format: "selected fields from primary and related tables"
output file: Library.txt
file type returned: gzip compressed
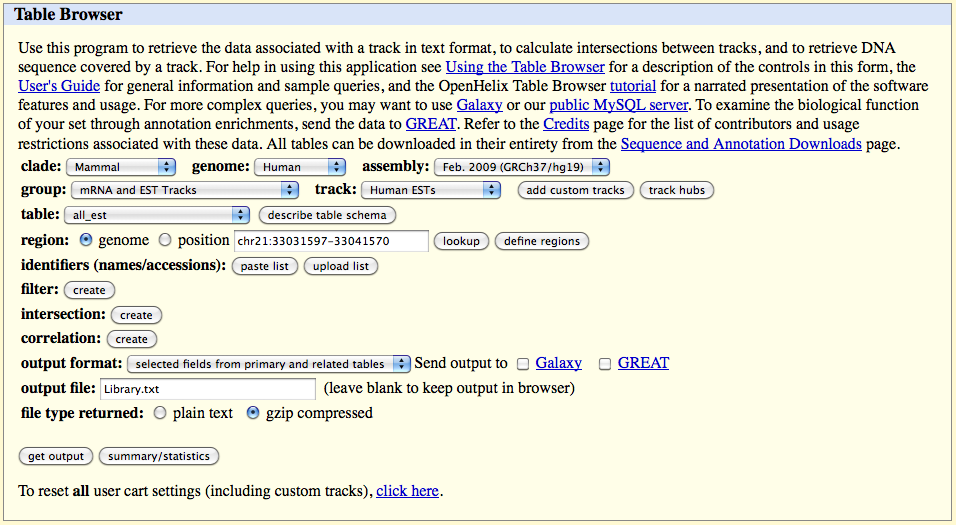
Click on the 'get output' button and select the following field in the table which appears:
qName
Select gbCdnaInfo from the below list of Linked Tables.
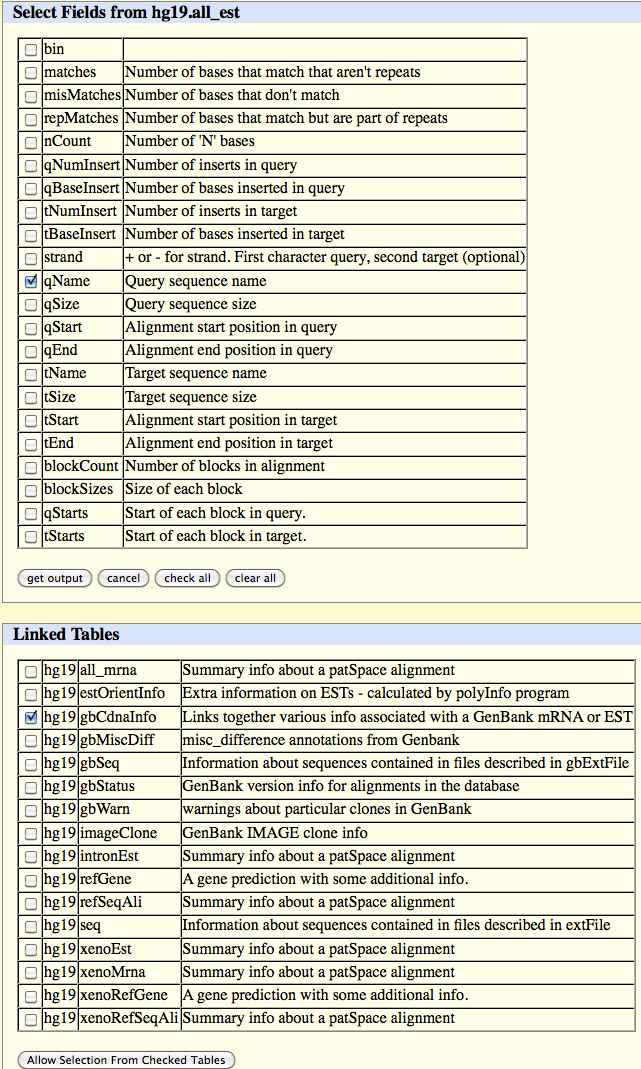
Click on the 'Allow Selection From Checked Table' button and select the following field in the table which appears:
library
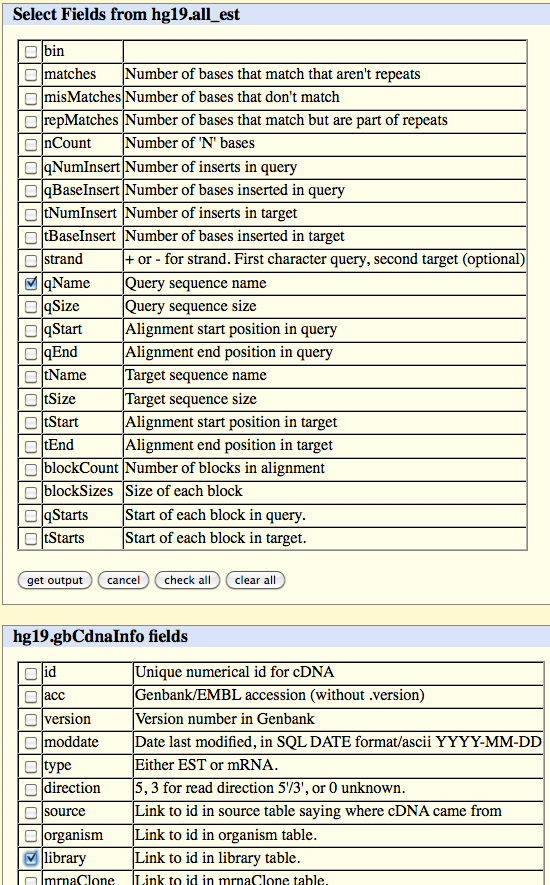
Click on the 'get output' button.
Once the download of the file 'Library.txt.gz' is complete, decompress it and put the resulting 'Library.txt' file into the '5'_ORF_Extender' folder.
In the '5'_ORF_Extender' software, switch to the 'Results' table by clicking on the yellow 'Results' button.
Select the "Process_Results" script from the "Scripts" menu to perform final calculations.
We added several functions which are useful for summarizing the results, by listing the number of ESTs supporting a specific extended sequence for each mRNA and the location (chromosome number) of the mRNA. Calculation of the total number of genomic loci for which at least one mRNA gives positive results was also implemented.
At the end of calculations, the software has determined various type of information for each EST extending an mRNA 5´ CDS in the 'Results' table:
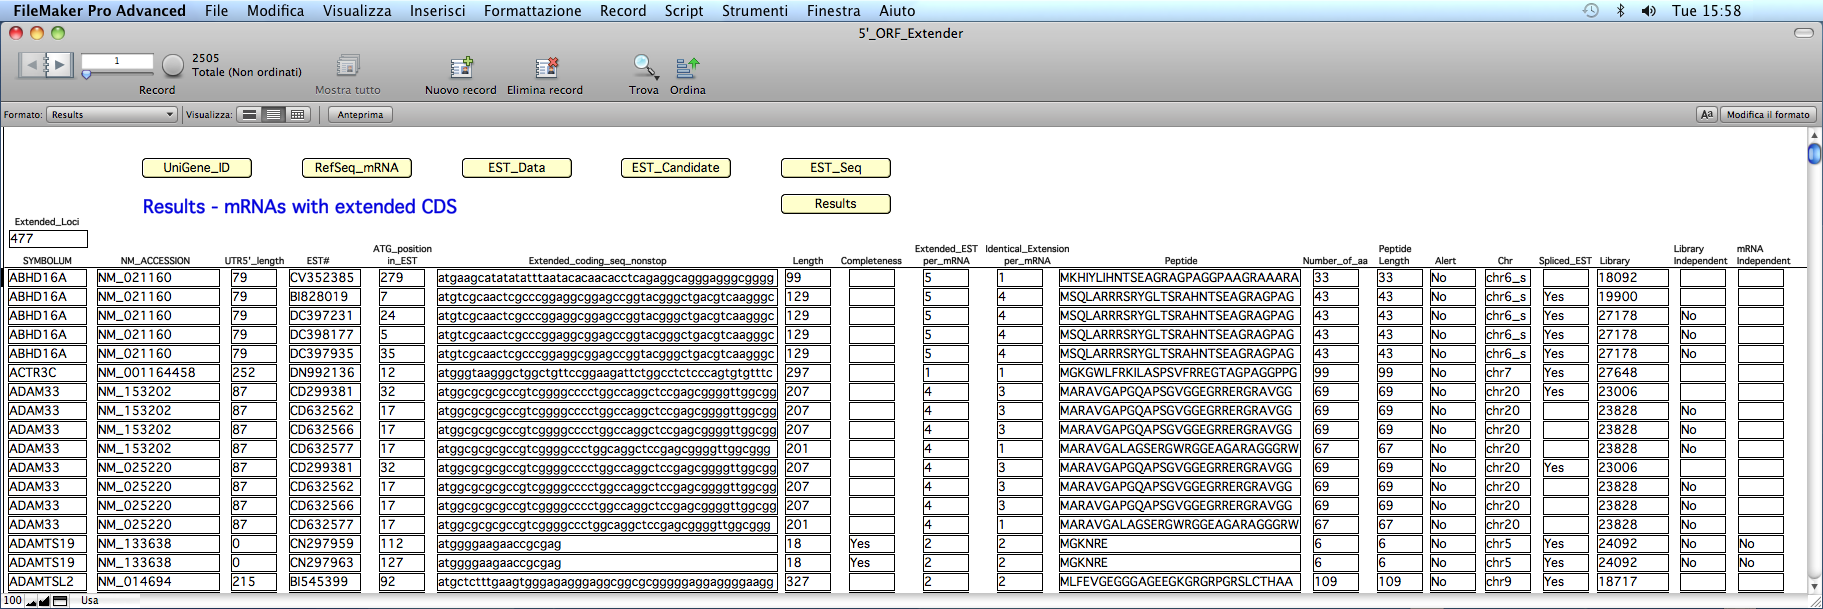
FIELDS DESCRIPTION
"Extended_Loci": the total number of loci with extended 5´ coding
sequence;
"SYMBOLUM": the gene symbol of the locus for which an mRNA
extension has been determined ;
"NM_Accession": the accession number of the RefSeq mRNA entry
(obtained from the RefSeq_Parser table);
"UTR5'_length": the length of the mRNA 5´ UTR sequence;
"EST#":
the accession number of the EST sequence assigned to
the same locus of the RefSeq mRNA sequence entry;
the same locus of the RefSeq mRNA sequence entry;
"ATG_position_in_EST": the position of the most upstream ATG located in the
EST sequence upstream the RefSeq sequence, which is
in-frame with the start codon recorded in the RefSeq
mRNA sequence entry;
"Extended_coding_seq":
the new extended mRNA 5´ end sequence, which is the
EST sequence extending from the new first in-frame ATG
codon to the first base upstream the RefSeq mRNA known
CDS;
EST sequence extending from the new first in-frame ATG
codon to the first base upstream the RefSeq mRNA known
CDS;
"Length": the length in base pair (bp) of the sequence in the
"Extended_coding_seq" field;
"Media_Length"*: the medium value of the length in bp of the new
extended mRNA 5´ end sequence;
"Standard_Deviation_Length"*: the standard deviation value of the length in
bp of the sequence in the "Extended_coding_seq" field;
"Completeness": the EST sequence containing an mRNA ORF extension is
scanned for the presence of an in-frame stop codon
upstream of the new initiation codon identified in the
EST; if it is found, the field shows "Yes";
"Extended_EST_per_mRNA": the number of the ESTs extending the same mRNA entry;
"Identical_Extension_per_mRNA": the number of the ESTs with identical sequence
extending the same mRNA entry;
"Peptide": the new extended amino terminus amino acid sequence
obtained by "Extended_coding_seq" field;
"Number_of_aa": the amino acid number counted in the "Peptide" field;
"Peptide_length": the new amino acid sequence length in "Peptide" field;
"Alert":
it shows "Yes" if the "Number_of_aa" field is
different from "Peptide length" field, as a quality
control;
different from "Peptide length" field, as a quality
control;
"Chr": it shows the chromosome location of the corresponding
entry;
"Spliced_EST":
it shows "Yes" if
the mRNA extension was determined
by a "spliced EST";
"Library": the library accession number;
by a "spliced EST";
"Library": the library accession number;
"Library_Independent":
it shows "No" if more than one EST for the same
alignment belong to the same library;
"mRNA_Independent": it shows "No" if the RefSeq mRNA CDS is extended by
ESTs all derived from the same library;
"Transcript_Complete": the mRNA sequence obtained by piecing
the existing RefSeq mRNA sequence with
the new extended mRNA 5´ end sequence;
"Transcript_Complete_Length": the length in bp of the sequence in the
"Transcript_Complete" field;
"Protein_Complete": the amino acid sequence of the new putative
extended protein;
"Protein_Complete_Length": the length in amino acids of the sequence in the
"Protein_Complete" field.
* = at the bottom of the page
In addition,
the 'Results.txt' file (that
contains
all these fields) is automatically created in the
'5'_ORF_Extender' folder.
4. GENERAL DEFINITIONS
(Back to Index)
4.1 File
A set of database tables.
4.2 Table
A
set of records referring to
the
same subject type (e.g., the 'Genes' table).
4.3. Record
One set of
fields which represent one entry (i.e. containing all requested
data for a subject, e.g. a gene probe).
The record browser is a small book icon at the top left of the window. You may also browse the records faster using the cursor at the right of the small book icon.
The record browser is a small book icon at the top left of the window. You may also browse the records faster using the cursor at the right of the small book icon.
4.4. Field
The database unit containing a specific data type (e.g., 'Gene_name').
4.5. Layout
A
particular graphical
organization of the field of a table.
A table can be visualized into more than one layout.
A layout may display fields from a table or its related fields from other tables.
A file may show data within different layouts.
Visualization of a field is independent from the storage of the contained data.
Browsing among the layouts can be made by clicking on the 'Layout:' pop-up Menu at the upper left corner.
You may browse the database by clicking on the small book pages at the top left of the window, or
using the cursor at the right of the small book icon, or by
entering a record number and clicking on the "Return" key.
The following information is constantly displayed on the window top bar (if not, select "Status Toolbar" from the "View" Menu):
Records: total number of Records in the table.
Found: total number of the subset of Records currently selected. Clicking on the green circular button will retrieve the complementary subset of currently omitted records.
Sorted: sorting status of the Records (Sorted/Unsorted).
The FileMaker Pro-based database may be used basically in these "modes":
'Browse', 'Find', and 'Preview'.
Switching among different modes can be done from the 'View' Menu or from the pop-up Menu bar at the bottom left of the window.
4.6 Browse Mode
One way to use the database.
It
allows entry, view,
browse, sort, and
manipulation of data.
It may be selected from:
the 'View' menu, or
the pop-up mode Menu bar, at the bottom left of the window.
It may be selected from:
the 'View' menu, or
the pop-up mode Menu bar, at the bottom left of the window.
In
the 'Browse' mode, the record sets can be browsed by clicking on the small book icon
(with the arrows to move 'back' and 'forward') in the upper left corner.
Browsing
among the tables can be done by clicking on the
'Layout' pop-up Menu at the upper left corner.
4.7 Find Mode
An
alternative mode to use the
database.
It allows searching for specific content in the database fields, using any different combination of criteria
(see the 'Search mode' section below for more details).
It may be selected from:
the 'View' menu, or
the mode pop-up Menu bar, at the bottom left of the window.
The user can fill a blank form allowing to search in specific fields.
In the "Find" mode, the small book icon in the upper left corner represents different "requests" that are made for searching the database.
In FileMaker Pro 'Find' mode, the "AND" - "OR" - "NOT" operators may be implemented in this way:
"AND" by filling criteria in different fields
located in the same "Request",
"OR" by generating additional requests
(from "Requests" Menu) in the same query,
"NOT" by generating additional requests
(from "Requests" Menu) and clicking on the "Omit"
button (located on the top bar in the window).
The 'Operators' pop-up Menu appears by clicking on a field while pressing the 'ctrl' key, allowing query of:
exact matches, duplicate values, ranges, wild cards and more.
Click on the 'Perform Find' button at the top of the window to start the query.
The result of the search is the subset of the entries matching the set search criteria.
4.8 Preview Mode
An
alternative way to use the
database.
It visualizes a print preview of the found records.
It may be selected from:
the "View" menu,
or the pop-up Menu bar, at the bottom left of the window.
In the "Preview" mode, the user can obtain a print preview of the data in the current table.
Browsing among the tables can be done by clicking on the 'Layout:' pop-up Menu at the upper left corner.
5. MENU AND COMMANDS
(Back to Index)
5.1 "5'_ORF_Extender" Menu
(Back to Index)
About
FileMaker Pro Runtime...
Information about FileMaker Pro Runtime at the core of the software.
Preferences...
Standard preferences panel; cache memory size can be set at up to 256 Mb.
Hide 5'_ORF_Extender
Hiding all 5'_ORF_Extender windows.
Quit 5'_ORF_Extender
Closing the program.
5.2
'File' Menu
Information about FileMaker Pro Runtime at the core of the software.
Preferences...
Standard preferences panel; cache memory size can be set at up to 256 Mb.
Hide 5'_ORF_Extender
Hiding all 5'_ORF_Extender windows.
Quit 5'_ORF_Extender
Closing the program.
(Back to Index)
File Options...
It is possible to set only the "Spelling" options.
Change Password...
There is no default password set.
Page setup...
Standard page set up command.
Print...
Standard print command.
The appearance will match the layout currently displayed on the screen.
Import Records
This is the general "Import" function of FileMaker Pro.
Export Records...
Save a Copy as...
It is possible to set only the "Spelling" options.
Change Password...
There is no default password set.
Page setup...
Standard page set up command.
Print...
Standard print command.
The appearance will match the layout currently displayed on the screen.
Import Records
This is the general "Import" function of FileMaker Pro.
Export Records...
Export
command for the found
records set in a given table.
Records are exported in their current sorting mode.
User can select fields to be exported, their relative order,
and the separation character.
Records are exported in their current sorting mode.
User can select fields to be exported, their relative order,
and the separation character.
Save a Copy as...
Save
a copy of the database,
complete, compressed or as
a clone (database structure with
no record present).
5.3 'Edit' Menu
(Back to Index)
Undo
Standard "Undo" command.
Cut
Standard "Cut" text command.
Copy
Standard "Copy" text command.
Paste
Standard "Paste" text command.
Select all
Selection of all text present within a selected field
(to select a field, click into the field).
Find/Replace
Utility for searching/replacing text strings within fields.
Note: Use 'Find' mode (from 'View' Menu)
for full search and selection of a record set.
Spelling
Function for checking spelling of text strings within fields.
Export Field Contents...
Function for exporting the contents of the selected field to a file.
5.4 'View' Menu
(Back to Index)
Browse Mode
Switch to the 'Browse Mode' (see "General Definitions" above).
Find Mode
Switch to the 'Find Mode' (see "General Definitions" above).
Preview Mode
Switch to the 'Preview Mode' (see "General Definitions" above).
Go to layout
A possible way to switch between different layouts.
View as Form
A possible way to individually display the current record of a found set of records.
View as List
A possible way to display all the records of a found set in the form of a list.
View as Table
A possible way to display all the records of a found set in the form of a spreadsheet-like table.
Toolbars
To switch on/off the toolbars of the application: "Standard"
and "Text Formatting".
Status Area
To switch on/off the "Status Area", the toolbar located at the top of the program window.
Text Ruler
To switch on/off the text ruler of the application.
Zoom in
Used to increase layout dimensions.
Zoom out
Used to decrease layout dimensions.
5.5 'Records' Menu
(Back to Index)
New Record
Creating a new empty record in the database.
The new Record will be the latest of the current record set.
Duplicate Record
Duplicating the current record in the database.
The new Record will be the latest of the current record set.
Delete Record...
Deleting the current record in the database.
Delete Found Records...
Deleting all currently found records in the database.
Go to Record
Moving to the selected record by number, previous or next.
Show All Records
Showing all the records in the database.
Show Omitted Only
Showing all the records in the database not included in the current 'found' set.
Omit Record
Removing the selected record out of the current found set, without deleting it.
Omit Multiple...
Removing more than a record, selected by numbers, out of the current found set, without deleting them.
Modify Last Find
Returning to the last performed search in order to edit it.
Saved Finds
Saving a set of search criteria.
Sort Records...
Sorting the current records set according to desired criteria.
Unsort
Display the current records set according to the order of creation of each record.
Replace Field Contents
Replace the value of a field into all found set of records with the value specified in the current record, or by calculation.
Relookup Field Contents...
This command executes a relook up of the value of a field by reading the matched value in a related table (the relationship has been established during database development using a 'key' field).
Revert Record...
Restoring the value of a field, discarding any change, before clicking out of that field.
5.6 'Scripts' Menu
(Back to Index)
About
Guide
The page with the user Guide of the 5'_ORF_Extender software (this Guide).
5.7 'Help' Menu
(Back to Index)
Search
Search a system 'Help' for the general commands.
TROUBLESHOOTING (Back to Index)
Sometimes, power failure, hardware problems, or other factors can damage a FileMaker Pro database file.
When the runtime application discovers a damaged file, a dialog box appears, prompting the user to contact the creator.
Even if the dialog box does not appear, files can exhibit erratic behaviour.
If you have FileMaker Pro or FileMaker Pro Advanced installed you can recover it using the 'Recover' command.
Otherwise, to recover a damaged file:
- On Mac OS X machines, press Command + Option (cmd-alt) while double-clicking the runtime application icon. Hold the keys down until you see the 'Open Damaged File' dialog box.
- On Windows machines, press Ctrl+Shift while double-clicking the runtime application icon. Hold the keys down until you see the Open Damaged File dialog box.
During the recovery process, the runtime application:
1. Creates a new file;
2.
Renames any damaged file by
adding “Old” to the end of the
file name;
3. Gives the repaired file the
original name.file name;